Production Set up of a Self-Managed Kubernetes cluster in AWS.
🟢 You will likely find this type of common setup of a k8s cluster in AWS in many companies.


Table of contents
Background Story:
Suppose your company decided to move its application to the k8s cluster.
And this task is given to your team.
Here, you have two options:
Managed Kubernetes (EKS, AKS, GKS)
Self-Managed Kubernetes (On EC2 instance, on-prem, etc.)
So, after some meetings, your team finally concluded creating Self Managed Kubernetes.
Reason:
Own Control
More Flexibility
📝Here are some advantages of using self-managed Kubernetes:
Control and Customization: By managing Kubernetes yourself, you have complete control over the environment, allowing you to configure and customize it as per your needs and requirements.
Scalability: Kubernetes is highly scalable, and when self-managed, you can scale it as per your specific needs and without any limitations imposed by a managed service.
Flexibility: With self-managed Kubernetes, you can choose the hardware and infrastructure that best fits your needs, providing maximum flexibility.
Cost Savings: Self-managed Kubernetes can be less expensive than managed services as you only pay for the infrastructure and resources you need rather than paying for additional features and services that you may not require.
Data Sovereignty: In some cases, particularly for regulated industries, self-managing Kubernetes can ensure that sensitive data remains within the control of your organization and within specific geographic boundaries.
Integration with Existing Tools and Workflows: With self-managed Kubernetes, you can integrate the platform with your existing tools and workflows, making it easier to manage and automate your operations.
Improved Performance: By managing your own Kubernetes environment, you can optimize the platform for your specific needs and requirements, resulting in improved performance and reliability.
Next, You decide on the cluster size and configuration:
→ So first, you analyze the requirements like cluster size, the operating system, CPU and ram size, etc., and you demand all requirements from the IT team or SysOps teams.
→ Finally, your team ended up deciding to create one master node and two worker nodes for development and testing out things in the k8s cluster.
→ Once the cluster is set up and configured correctly, we can scale it by creating multiple replicas for high availability in a production environment.
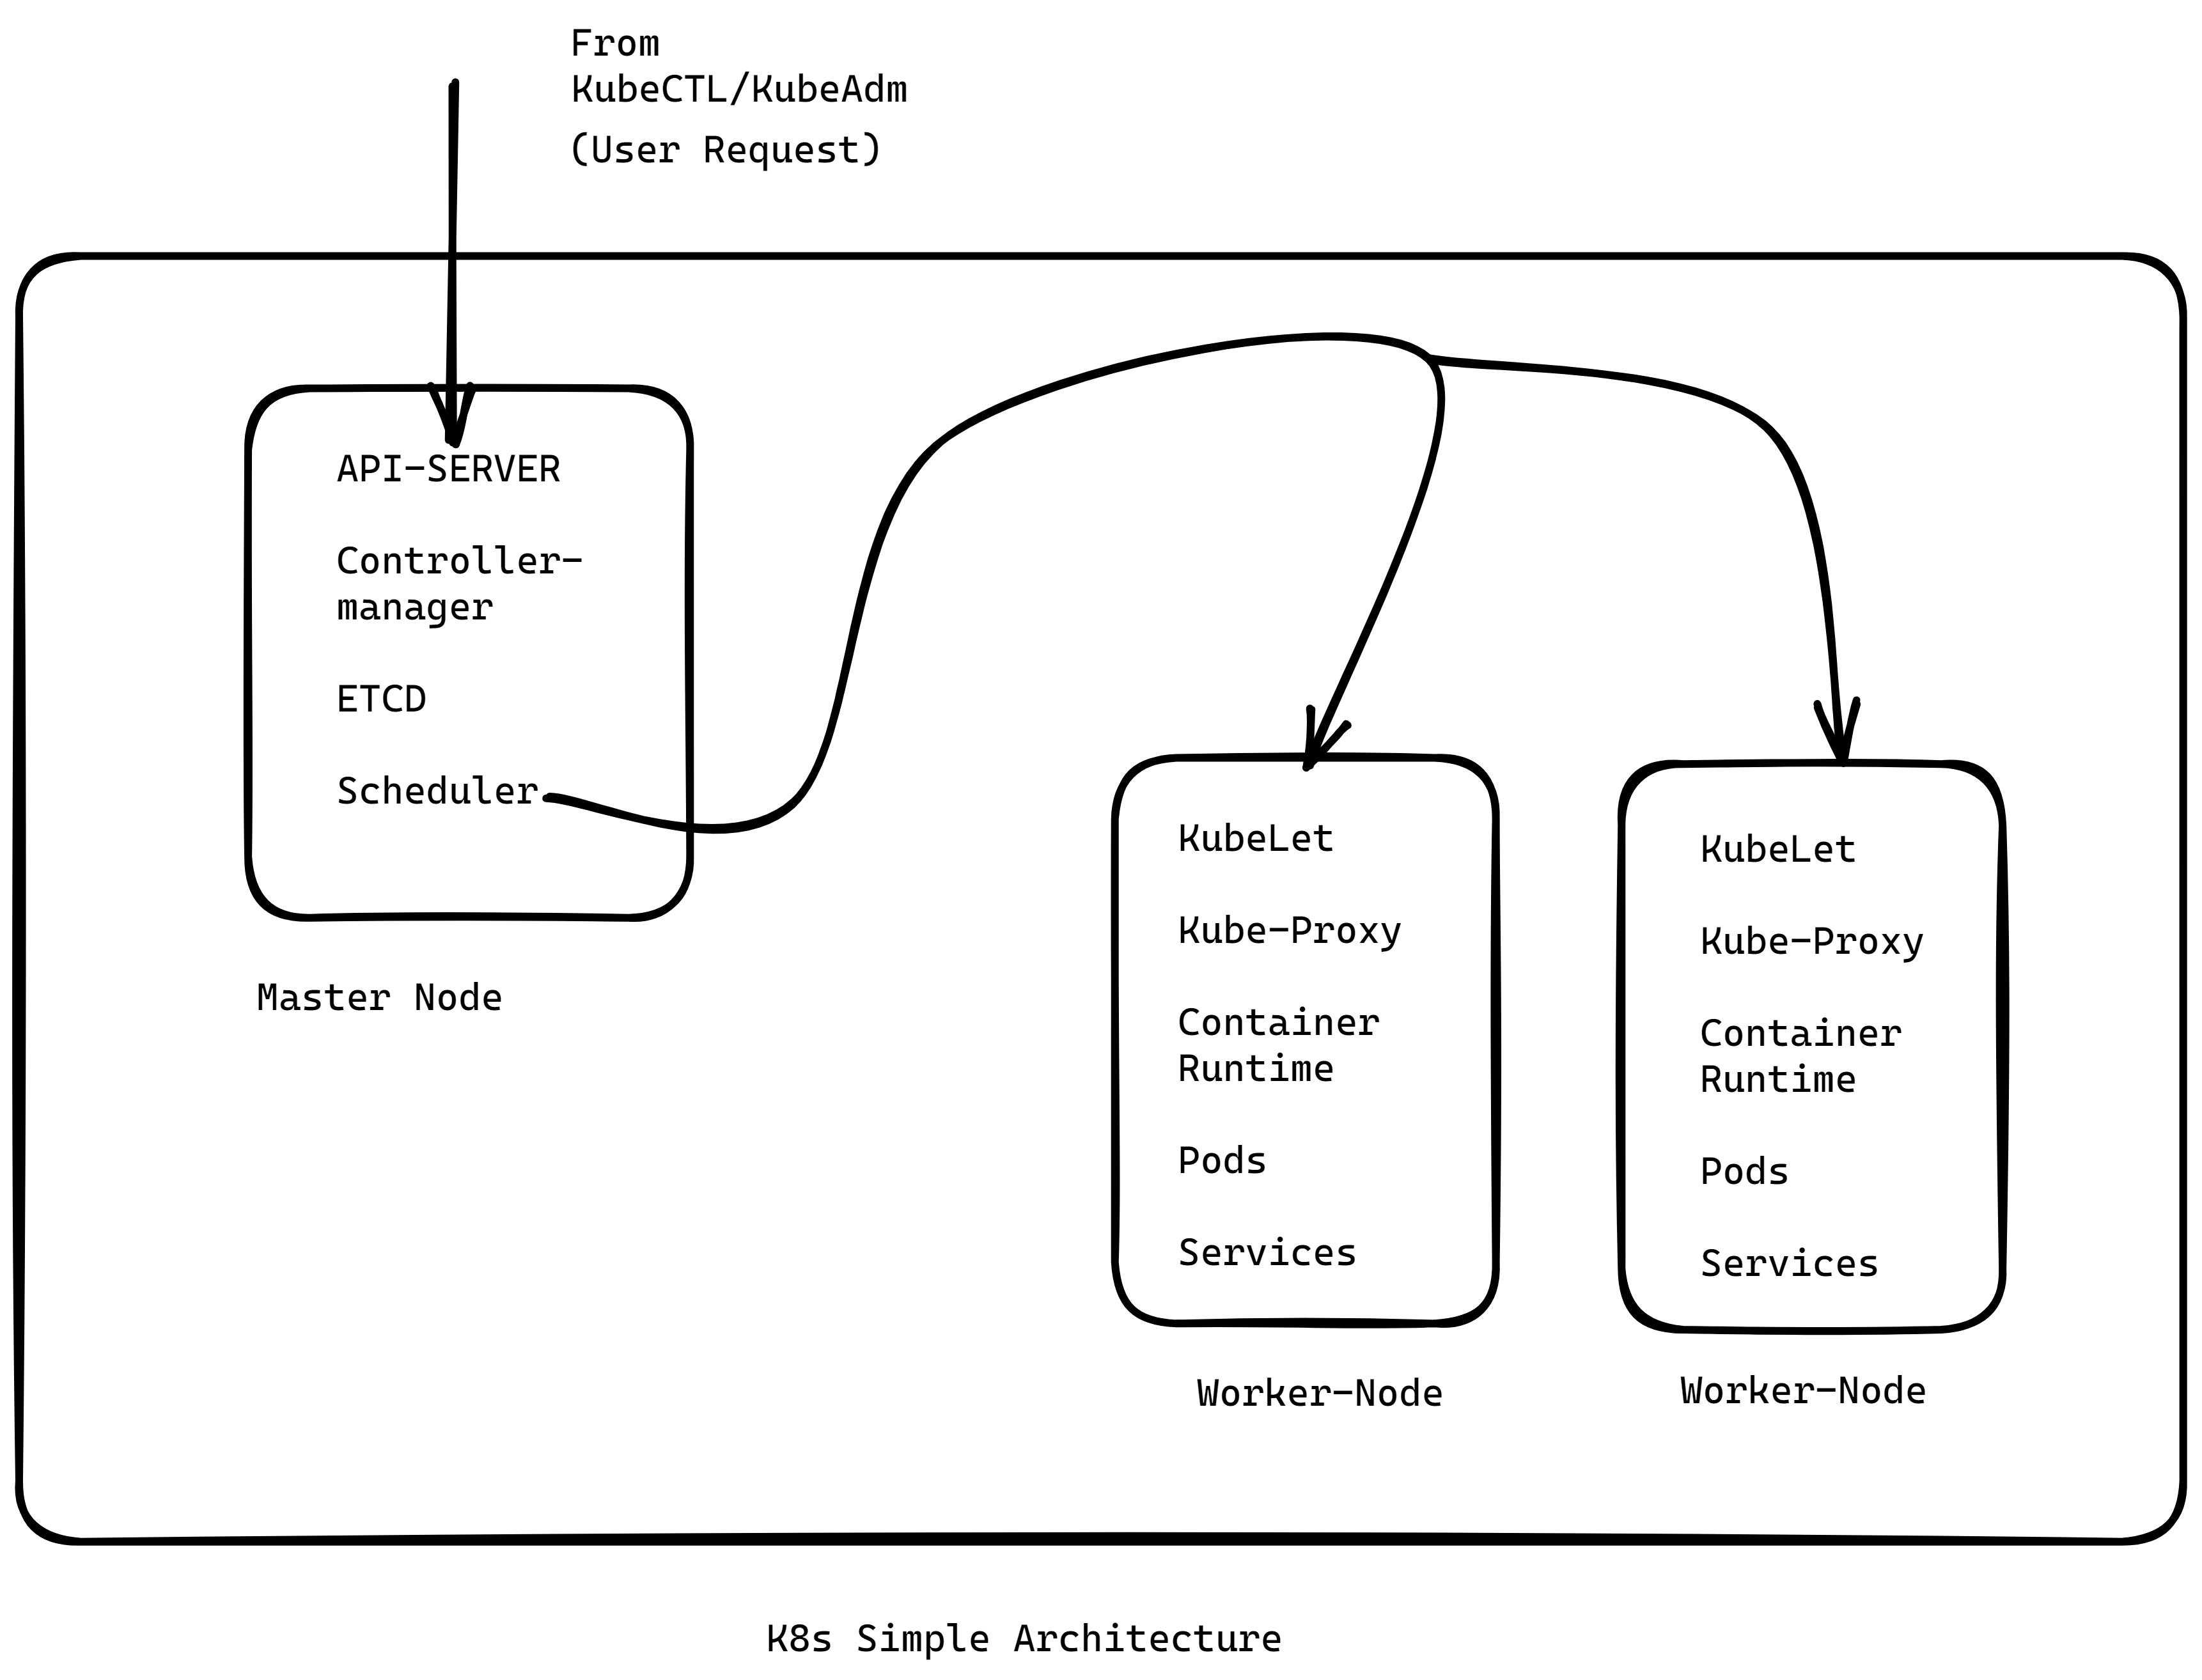
👀Architecture Overview Of Kubernetes Cluster:
🚀Let's Understand What Kubernetes is and what are all components we need for our setup:
🚀***Kubernetes, also known as K8s, is an open-source system for automating containerized applications' deployment, scaling, and management.***
✅Components Of Master Node (Control Plane):
→ A Kubernetes master node is the controlling node in a Kubernetes cluster that is responsible for managing the overall state of the cluster.
The following components are typically found on a Kubernetes master node:
💡 Etcd: This is a distributed key-value store that stores the configuration data of the cluster.
💡 Kube-API server: This component exposes the Kubernetes API and handles all API requests.
💡Kube-controller-manager: This component is responsible for maintaining the desired state of the cluster by monitoring and making changes to the current state of the cluster.
💡 Kube-scheduler: This component is responsible for scheduling pods on worker nodes.
💡Kubectl: This is a command-line tool that interacts with the Kubernetes API.
✅Components Of Worker Node:
→ Kubernetes worker node is a node that runs pods and is managed by the master node.
The following components are typically found on a Kubernetes worker node:
💡Kubelet: This component is responsible for communicating with the master node and ensuring that the pods' desired state is maintained on the worker node.
💡Kube-proxy: This component is responsible for providing network connectivity for pods on the worker node.
💡Container runtime: This component is responsible for running containers on the worker node, such as Docker or Containerd.
💡Pods: Pods are the smallest and simplest unit in the Kubernetes object model and are the logical host for one or more containers.
💡Services: Services are the way to expose the pods to the external world, and they can be exposed through various types of services, such as ClusterIP, NodePort, LoadBalancer, ExternalName, etc.
⚙️Setup Time:
Create AWS EC2 Instance.
Installing Container Runtime in all Nodes(Worker + Master).
Kubelet, Kubeadm, and Kubectl in all Nodes(Worker + Master).
Using Kubeadm and Kubelet to Configure Master Node and Connecting Worker Node.
Creating New User for a developer to access the cluster with some permission and access limits to resources.
🚀Create AWS EC2 Instance:
🪜Step:
→ Create 3 instances, all within the same VPC and default subnet.
→ Name 1 instance “Master” and rest “Worker1, Worker2”.
→ Configure Security Group and Expose port on Master SG and Worker SG.
Don’t know how to launch EC2 Instance?
🔗Here, I have got you covered below 👇:
youtube.com/watch?v=cRuQhkHD5S4
📝Note:
→ Create or Configure Master Node in the Master Security Group and Worker Node in the Worker Security Group.
→ Also, configure the same “SSH keys” for all nodes(Master + Worker).
👉Best Practice:
→ Make sure to give 400 permission set to the owner of the ssh private key (EC2 instance).
→ Set Hostname for the machine. For example, for the master node, use cmd:
"sudo hostnamectl set-hostname <hostname>"
→ Also, Configure the DNS name in the /etc/hosts file. For example,
master <internal IP address(mentioned in aws)>

worker1 <internal IP address(mentioned in aws)>

worker2 <internal IP address(mentioned in aws)>
→ Doing so will make work much easier and more understandable.
Time to Configure Ports on the master and worker security group, follow this page for the correct port number:
🚀Install Container Runtime:
What is Container Runtime ❓
→ A container runtime, also known as a container engine, is a software component that can run containers on a host operating system.
→ You need to install a Container Runtime into each node in the cluster so Pods can run there. This page outlines what is involved and describes related tasks for setting up nodes.
🔗Link:
First, Install whatever is said in the “Forwarding IPv4 and letting iptables see bridged traffic” section.
i.e 👇 this part
cat <<EOF | sudo tee /etc/modules-load.d/k8s.conf
overlay
br_netfilter
EOF

sudo modprobe overlay
sudo modprobe br_netfilter

# sysctl params required by setup, params persist across reboots
cat <<EOF | sudo tee /etc/sysctl.d/k8s.conf
net.bridge.bridge-nf-call-iptables  = 1
net.bridge.bridge-nf-call-ip6tables = 1
net.ipv4.ip_forward                 = 1
EOF

# Apply sysctl params without reboot
sudo sysctl --system
✅Now Install containerd runtime interface using the below command:
Sudo apt-get update
Sudo apt-get install containerd
mkdir -p /etc/containerd
contained config default | sudo tee /etc/containerd/config.toml
sudo systemctl restart containerd
service contained status
📝Note:
Container Runtime needs to be installed in all nodes. It's better to create a script to install container runtime by pasting all commands in one script and giving it a .sh extension with appropriate permission to execute.
🚀INSTALL → Kubelet, Kubeadm, Kubectl:
💥What is Kubelet ❓
→ It is a process that runs on the master and node to deploy pods.
💥What is Kubeadm ❓
→ Kubeadm is a tool built to provide kubeadm init and kubeadm join as best-practice "fast paths" for creating Kubernetes clusters.
→ kubeadm performs the actions necessary to get a minimum viable cluster up and running. By design, it cares only about bootstrapping, not about provisioning machines.
💥What is Kubectl ❓
→ This is a Command Line Tool whose main job is to talk to the k8s cluster.
✅Steps to Install:
sudo apt-get update
sudo apt-get install -y apt-transport-https ca-certificates curl
sudo curl -fsSLo /etc/apt/keyrings/kubernetes-archive-keyring.gpg packages.cloud.google.com/apt/doc/apt-key.gpg
echo "deb [signed-by=/etc/apt/keyrings/kubernetes-archive-keyring.gpg] apt.kubernetes.io kubernetes-xenial main" | sudo tee /etc/apt/sources.list.d/kubernetes.list
sudo apt-get update
sudo apt-get install -y kubelet kubeadm kubectl
sudo apt-mark hold kubelet kubeadm kubectl
📝Let's understand the importance of Kubelet, Kubeadm, and Kubectl:
✅Kubelet:
→ It is a daemon process that schedules pods to the k8s cluster.
→ Kubelet is actively looking for manifest files in /etc/kubernetes/manifests/ folder to deploy pod-like API Server, Controller Manager, Etcd, and Scheduler on the master node.
✅Kubeadm:
→ Kubeadm is mainly responsible for bootstrapping the k8s cluster.
→ Things kubeadm does:
Create configuration files for all main components of master nodes like API Server, Controller Manager, Etcd, and Scheduler.
Set up Public Key Infrastructure for our Kubernetes components.
→ This could also be done manually, but it is a very tedious task. That’s why kubeadm was created to do bootstrapping of clusters into our nodes.
→ Execute this command on the master node: “sudo kubeadm init “💥 BOOM!! DONE!
✅Kubectl:
→ it is a simple command line tool that talks to our cluster.
📝Note:
What is public key infrastructure?
→ In simple terms, it is an authentication system when two component talks to each other like a client-server. You don’t have to worry about this kubeadm has covered for us.
🚀Now, time to configure and connect the worker node to the master:
→ You remember we run a cmd: “kubeadm init”.
→ When it executes completely, it gives all data components and resources created, and at the end of that data, you will see one command that kubeadm gives you.
→ Looks very similar to this “kubectl join <master node internal IP address> --token *** --discovery-token-ca-cert-hash sha256:** ***”
→ Copy and paste this cmd in Worker Node that’s it.
→ In case you forget to copy and clear the terminal screen ”kubeadm token create --print-join-command” ← this will generate a complete cmd. Just copy-paste to the worker node.
🚀Connecting to Cluster(Master Node) being local user:
→ Time to connect with the cluster
→ Kubeadm generated client certificate we can use named "admin.conf".
→ "Admin.conf" file is basically "kubeconfig" file to authenticate to k8s via api-server.
→ Location of admin.conf (Named as kubeconfig file) is /etc/kubernetes/admin.conf
Write this command:
kubectl get node --kubeconfig /etc/kubernetes/admin.conf
💥💥BOOM AGAIN!!!!
✅ DONE🔥🔥
We finally set up the real-world production setup of the k8s cluster.
Thanks For Reading 🙏. I hope you learned a lot, if “yes” then don't forget to share it on social media like LinkedIn and Twitter and share what you've learned from this blog in your network… Also, don't forget to tag me.
I will be creating more blogs like this. Please let me know if I forgot any task or point in the comment section. I will modify it asap...
Don't forget to follow me on socials 🧡:
LinkedIn: https://www.linkedin.com/in/bhavesh-muleva-68015b1b9/
Twitter: https://twitter.com/BhaveshMuleva
Things not covered
"Weave-Net networking tool in Kubernetes."
The command for weave net:
“kubectl apply -f github.com/weaveworks/weave/releases/downlo..”
Note:
Make sure to open the port for weave-net traffic to flow in the security group of aws and specify the --ipalloc-range=<weave net IP range> in the API-server config file (NS).
✅ Done network part is also configured.