

Table of contents
- 1. Introduction:
- 2. Project Flow:
- 3. Step 1: Creating Two Security Group
- 4. Step 2: Creating ECS Cluster
- 5. Step 3: Creating Task Definition for Nginx
- 6. Step 4: Creating an ECS Service for Nginx.
- 7. Step 5: Configure the right security group to load balancer.
- 8. Paste it to a web browser!!!
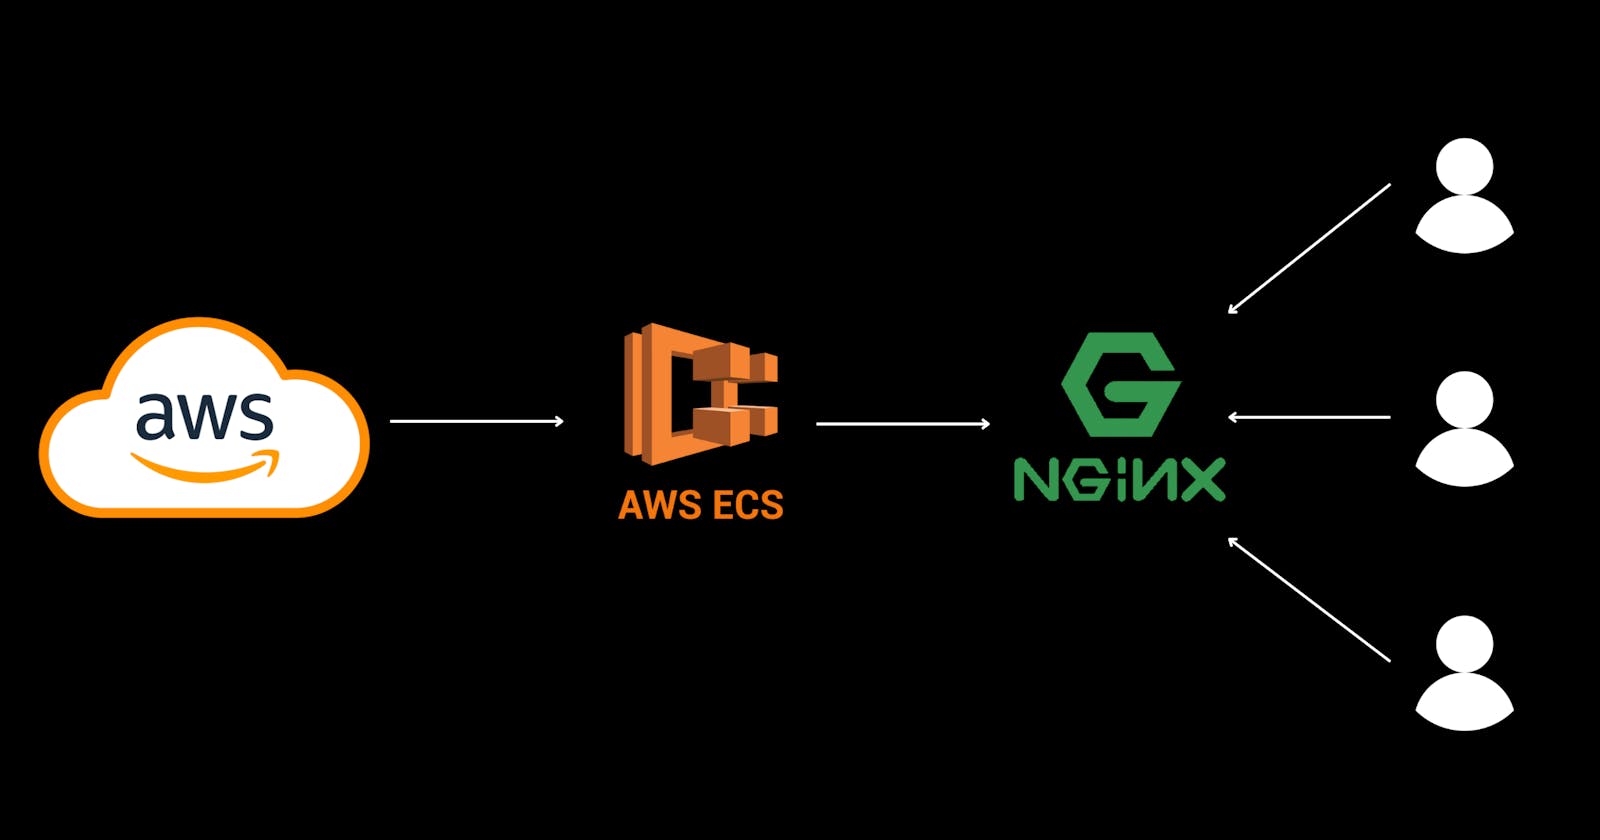
- Quick Glimpse of what we have done so far !!
1. Introduction:
In today's blog, we will explore the powerful combination of Amazon Elastic Container Service (ECS) with Nginx as a service, complemented by a load balancer. ECS is a highly scalable container orchestration service provided by Amazon Web Services (AWS), while Nginx is a popular open-source web server known for its high performance and flexibility. By utilizing ECS, Nginx, and a load balancer together, we can achieve efficient container management, improved application availability, and enhanced scalability. In this blog, we will delve into the key concepts, deployment strategies, and best practices for using ECS with Nginx and a load balancer.
1.1 Overview:
Amazon Elastic Container Service (ECS) is a fully managed container orchestration service provided by Amazon Web Services (AWS). It simplifies the process of running containers at scale, allowing developers to focus on building applications rather than managing infrastructure. ECS provides a robust and flexible platform for deploying, scaling, and managing containerized applications.
Nginx, on the other hand, is a popular open-source web server renowned for its high performance, reliability, and versatility. It excels at handling concurrent connections and efficiently serving static and dynamic content, making it an ideal choice for modern web applications.
To ensure optimal performance and high availability of containerized applications, a load balancer plays a crucial role. Load balancers distribute incoming traffic across multiple instances, improving application availability and evenly distributing the workload.
1.2 Importance Of ECS, NGINX and LoadBalancer Combination:
Scalability: ECS allows businesses to scale their containerized applications effortlessly. With its auto-scaling capabilities, ECS can automatically adjust the number of containers based on demand. When coupled with Nginx, which efficiently handles concurrent connections, businesses can achieve seamless horizontal scaling, ensuring applications can handle increasing traffic loads without compromising performance.
High Availability: By leveraging ECS with a load balancer, businesses can achieve high availability for their applications. The load balancer distributes incoming traffic across multiple ECS instances, ensuring that if one instance becomes unavailable, traffic is automatically routed to healthy instances. This redundancy helps minimize downtime and provides a resilient infrastructure.
Performance Optimization: Nginx acts as a reverse proxy in front of ECS containers, enabling efficient traffic routing and load balancing. With its advanced caching capabilities, Nginx can serve static content directly from memory, reducing the load on backend servers and improving overall application performance. Additionally, Nginx's ability to handle thousands of concurrent connections allows for efficient handling of high traffic volumes.
Flexibility and Agility: The combination of ECS, Nginx, and a load balancer offers businesses flexibility and agility in deploying and managing applications. ECS provides a highly scalable and flexible container orchestration platform, while Nginx allows for easy configuration and customization of routing rules, SSL termination, and caching. This combination empowers businesses to adapt quickly to changing demands and efficiently deliver their applications to end-users.
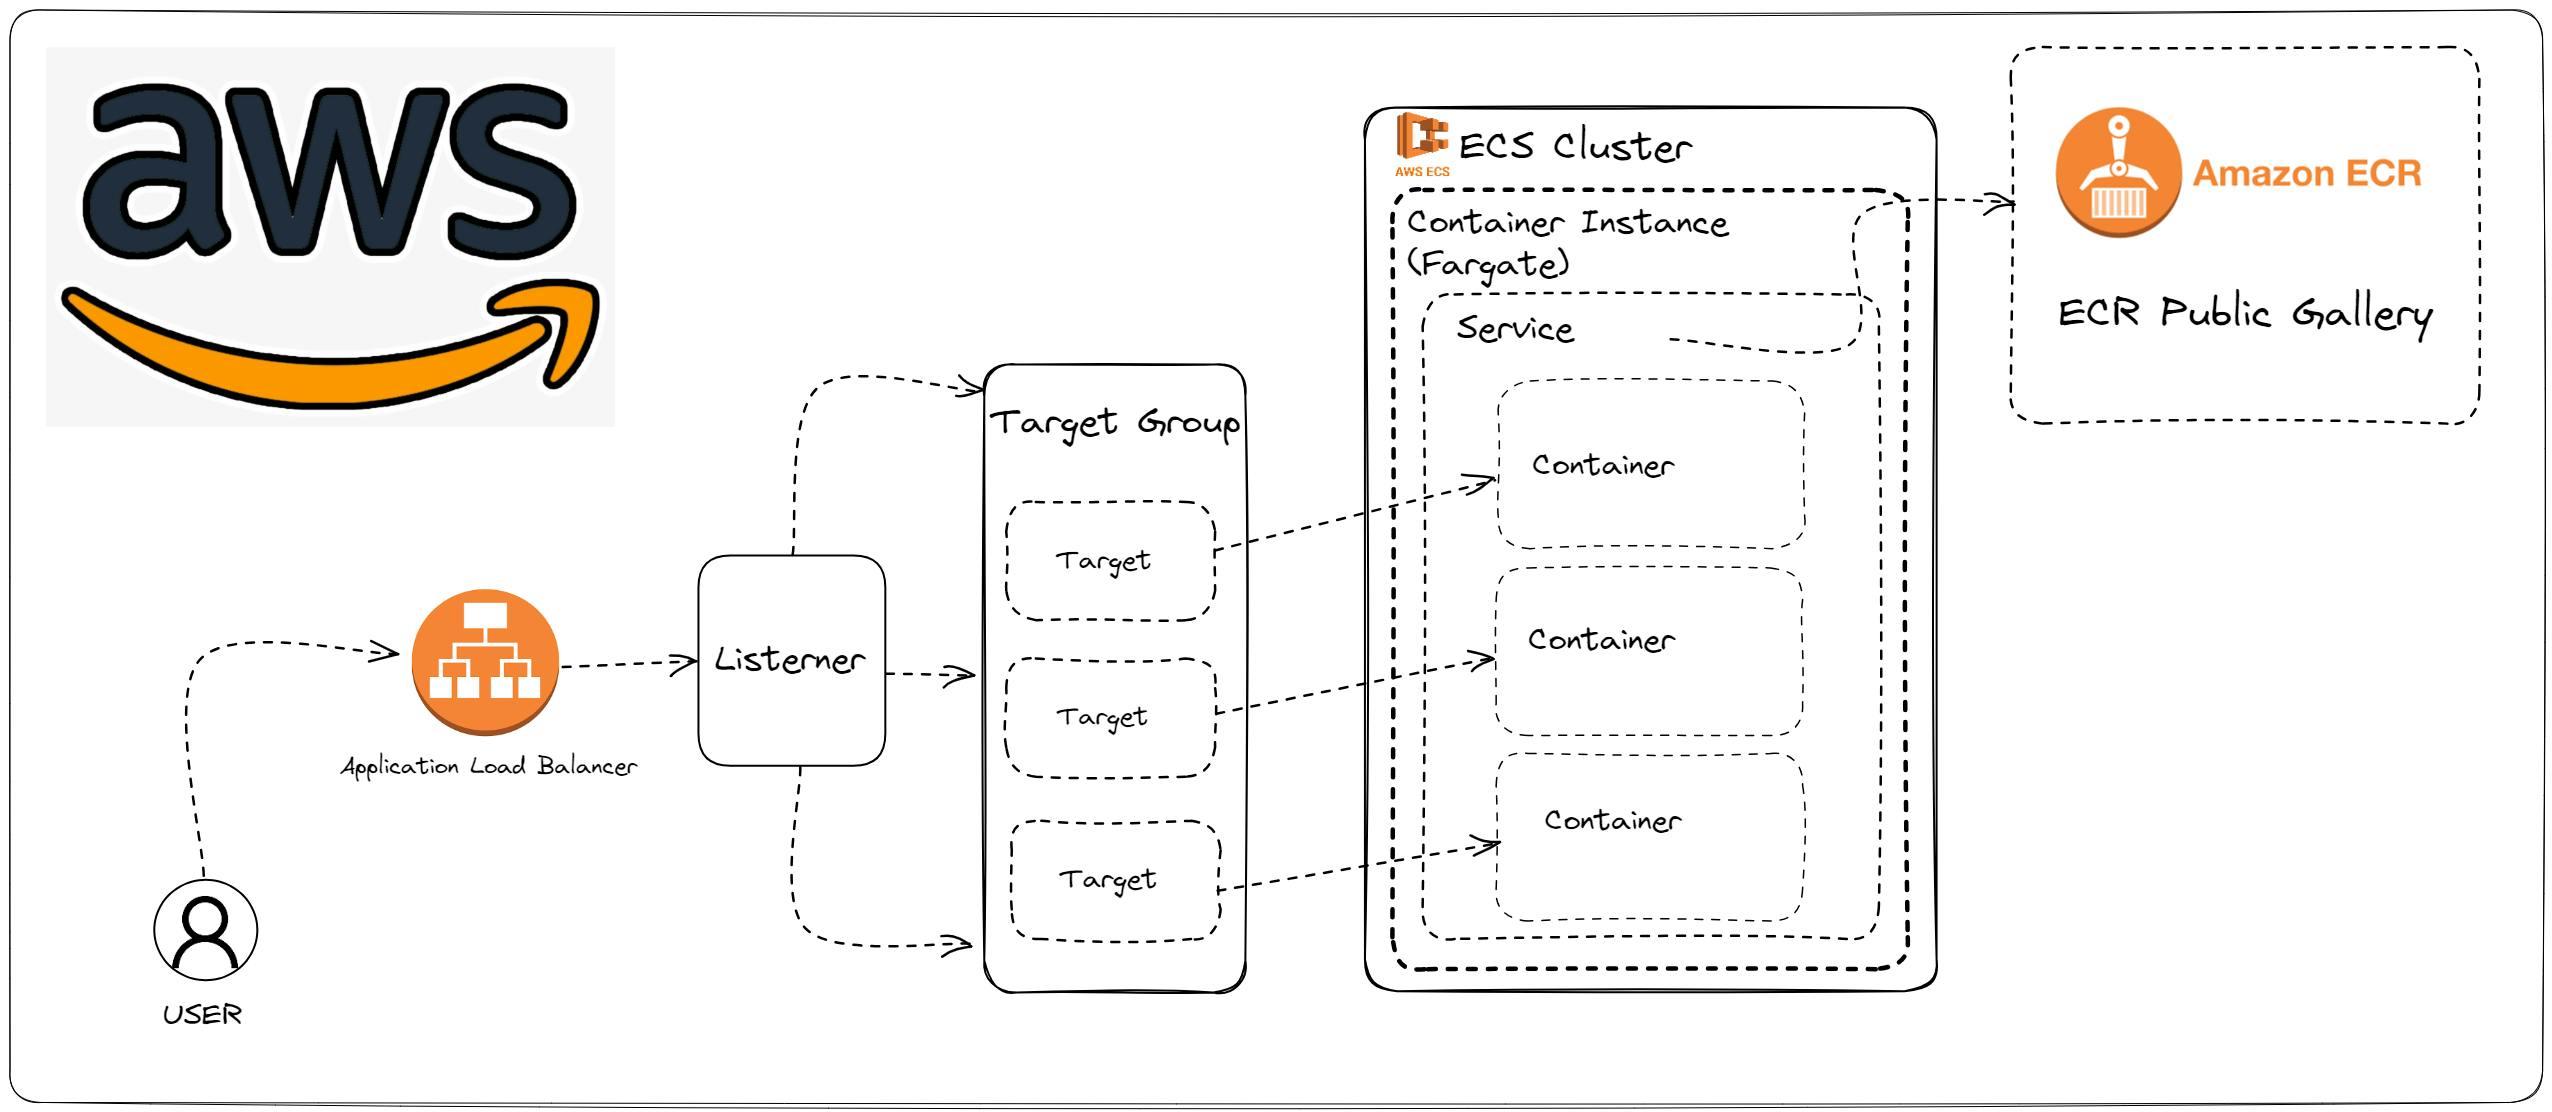
2. Project Flow:
3. Step 1: Creating Two Security Group
Firstly, will create a two-security group
ApplicationLoadBalancerSecurityGroup - Will be Attached to ALB.
ContainerFromALBSecurityGroup - Will be Attached to services defining container.
3.1 Creating and Configuring a Security Group for the Load Balancer
For, ALB Security Group we name it "ApplicationLoadBalancerSecurityGroup" with some description and host it into default VPC. Then, will open inbound traffic at port 80 with Type:HTTP.
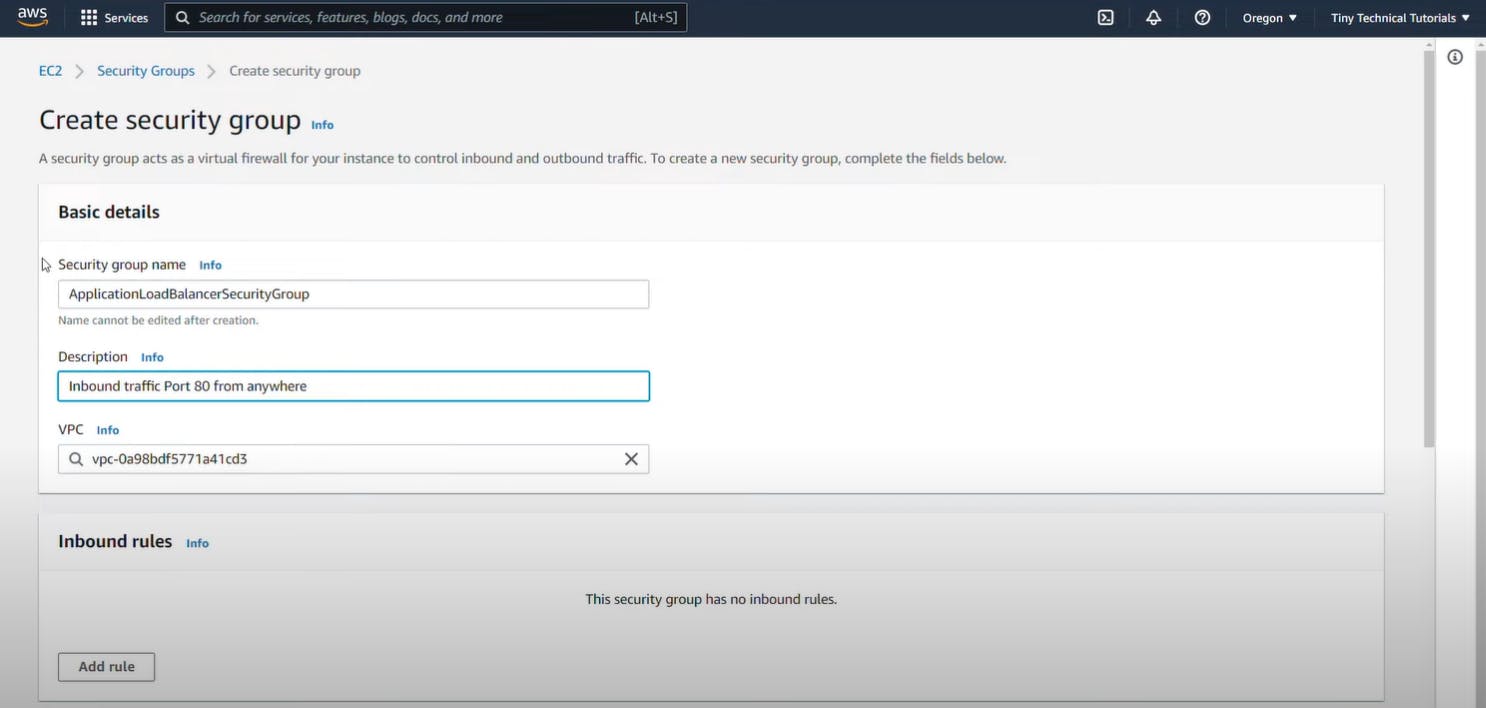

Why we are opening inbound port no:80?
-> Because we want to allow HTTP traffic to pass through the security group of the load balancer.Note: From this point onwards remember whatever AWS Resource you create in your account should be in one particular VPC and in this tutorial, we are using the default one.
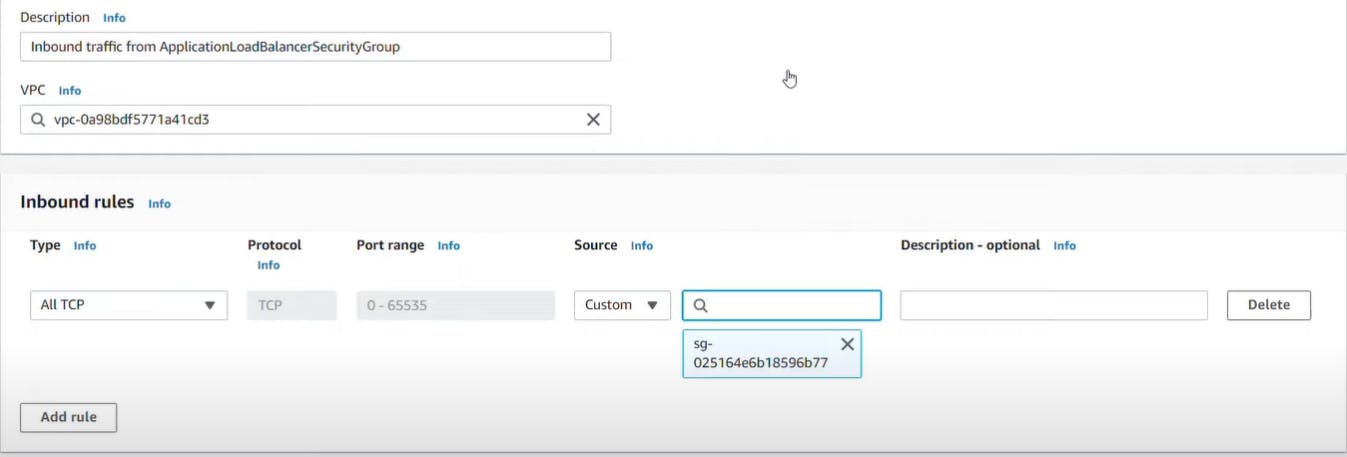
3.2 Creating and Configuring Security Group for Container Traffic.
For, ALB Security Group we name it "ContainerFromALBSecurityGroup" with some description and host it into default VPC. Then, will open inbound traffic from "ApplicationLoadBalancerSecurityGroup" with Type: All TCP.

4. Step 2: Creating ECS Cluster
4.1 Overview of ECS:
Amazon Elastic Container Service (ECS) cluster is a logical grouping of container instances where you can deploy and manage your containerized applications. It provides a scalable and efficient platform for running containers in a highly available and fault-tolerant manner.
An ECS cluster acts as a logical unit that allows you to organize and manage your container instances effectively. It enables you to deploy multiple tasks, which are sets of containers, across a cluster of instances. This clustering capability allows for better resource utilization, improved scalability, and simplified management of your containerized applications.
With ECS clusters, you can easily scale your containerized applications horizontally by adding or removing instances from the cluster based on demand. ECS provides automatic scaling capabilities that can dynamically adjust the number of instances in the cluster to match the workload.
Additionally, ECS clusters integrate seamlessly with other AWS services, such as Elastic Load Balancing, enabling you to distribute incoming traffic across multiple containers or instances for improved availability and performance.
ECS clusters also offer features like container instance management, resource allocation, and monitoring. You can define task placement strategies, specify resource requirements, and monitor the health and performance of your container instances within the cluster.
In summary, ECS clusters provide a scalable and manageable environment for running containerized applications. They enable efficient resource utilization, easy scalability, and integration with other AWS services, making them a powerful tool for deploying and managing containers in production environments.
4.2 Creating an ECS Cluster.
Go to AWS console management, open the services section search for Elastic Container Service and click it. It will open the ECS cluster dashboard create a new cluster and give the name "my-first-cluster".

Note: Make sure the VPC is the default one.
5. Step 3: Creating Task Definition for Nginx
5.1 Understanding Task Definitions
In Amazon Elastic Container Service (ECS), a task definition is a blueprint that describes how a containerized application should be run. It defines the configuration and specifications for one or more containers that make up a task, including information such as the Docker image to use, CPU and memory requirements, networking details, and container dependencies.
Task definitions provide a flexible and reusable way to define the parameters and settings for running containers within ECS. They allow you to specify the essential components and configurations needed to launch and manage your containerized applications effectively.
With task definitions, you can define multiple containers that work together as a cohesive unit within a task. For example, a task definition might include a web server container, a backend application container, and a database container, all working together to deliver a complete application stack.
Task definitions also allow you to specify container-level configurations such as environment variables, networking modes, port mappings, and resource limits. This flexibility enables you to tailor the behavior and performance of individual containers within your application.
Once a task definition is created, you can use it to launch tasks within an ECS cluster. You can deploy multiple tasks based on the same task definition across different instances or configure scaling rules to automatically adjust the number of tasks based on demand.
In summary, task definitions in ECS provide a standardized way to define and configure the containers that make up your application. They enable flexibility, scalability, and manageability by allowing you to define and launch tasks with specific container configurations, dependencies, and resource requirements.
5.2 Pulling Nginx Docker Image from ECR Gallery
Amazon ECR serves as a secure and scalable repository for Docker container images. It integrates seamlessly with other AWS services such as Amazon ECS, Amazon Elastic Kubernetes Service (EKS), and AWS Fargate, making it easy to deploy and manage containerized applications.
NGINX REPOSITORY ON ECR <- Link
Will now create a task definition of nginx image with port mapping set to 80 for traffic.
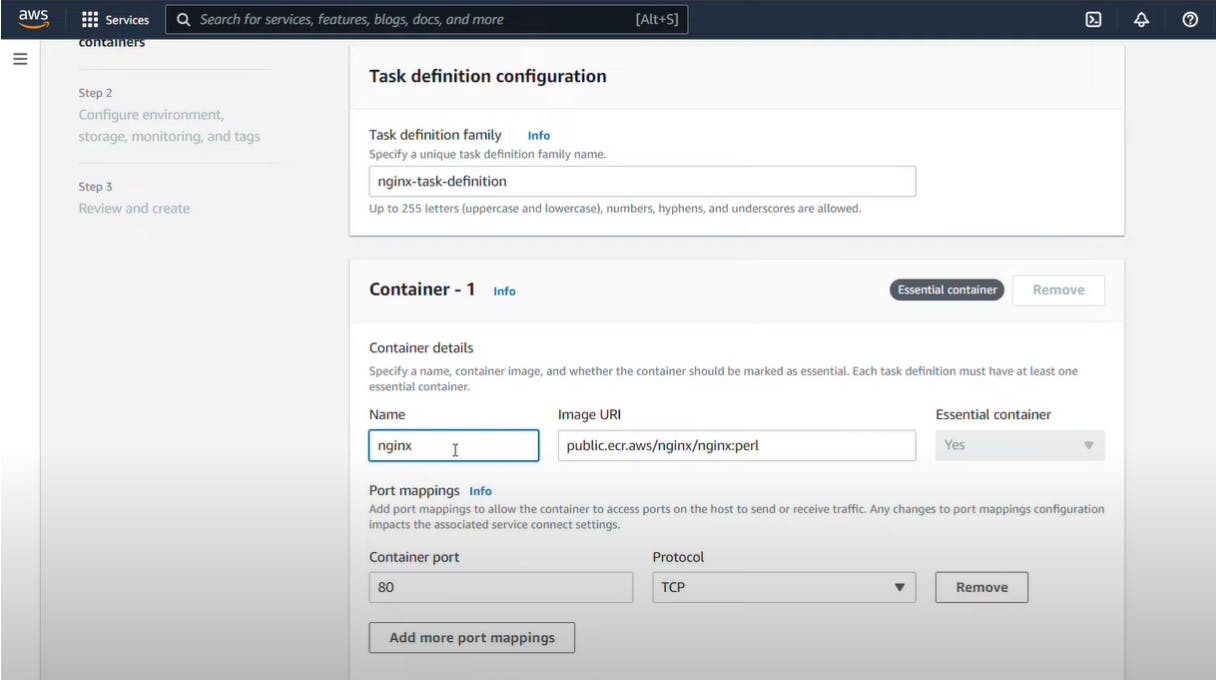
Here is the task definition of the NGINX Image.
6. Step 4: Creating an ECS Service for Nginx.
6.1 Overview of ECS Services
In Amazon Elastic Container Service (ECS), a service is a long-running task that runs and maintains a specified number of instances of a task definition. ECS services allow you to deploy, scale, and manage containerized applications in a highly available and automated manner.
Services in ECS provide a way to define the desired state of your application and manage its lifecycle. They ensure that the specified number of tasks are running at all times, automatically replacing failed tasks and scaling the number of tasks based on demand.
When creating an ECS service, you associate it with a specific task definition, which defines the containers and configurations needed for your application. The service then launches and manages tasks based on this definition, distributing them across the available instances within an ECS cluster.
6.2 Creating ECS Service using Task-definition.

Here we are creating a deployment service by adding a pre-created task definition named nginx-task-definition with desired tasks set to 3 which creates 3 tasks with the same task definition within the same service.
6.3 Attaching a load balancer to the same Nginx service.
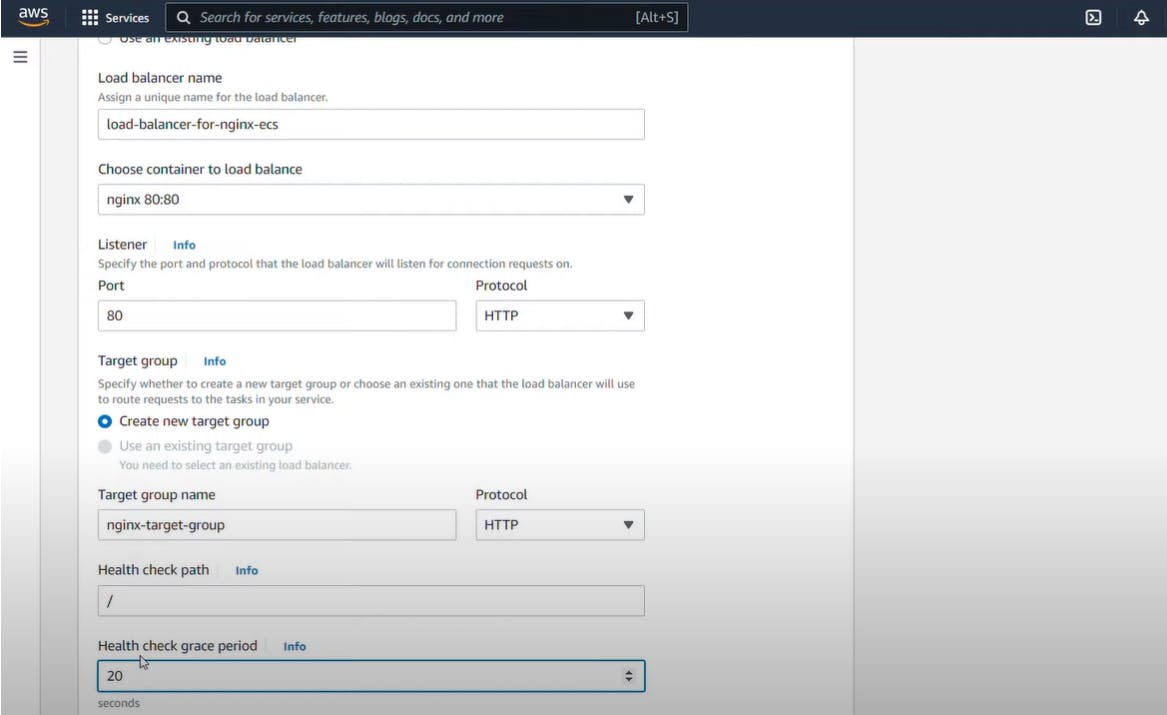
Here, we have specified nginx 80:80 which redirects the load balancer traffic coming to port 80 to container port 80 with HTTP protocol enabled.
Do note that we are creating a new target group for our service. A target group is one on which the load balancer will connect to.
Note: Target Group is nothing but a controller of targets that we define as service. for example, here we have nginx as a service that is attached to one target group in which we can define the number of tasks/services count, etc. In the same way, if we create a new service we also create a new corresponding target.
7. Step 5: Configure the right security group to load balancer.
7.1 Configuring the right security group to load balancer
Go, into Application Load Balancer and select the one which you have created while service creation. Then in the below tab, there will be a security section inside you will see there is a default security group attached to it. click on edit then change the security group with the one you have created at the beginning of the tutorial named "ApplicationLoadBalancerSecurityGroup"
7.2 Hit the load balancer URL:
Copy the load balancer DNS name

8. Paste it to a web browser!!!


Quick Glimpse of what we have done so far !!
In this project, we have utilized Amazon Elastic Container Service (ECS) along with Nginx as a service, complemented by a load balancer. ECS allowed you to easily manage and orchestrate your containerized applications, providing scalability and high availability.
To begin, we created a security group for the load balancer, allowing inbound traffic on port 80 from anywhere. we also configured the security group for the container to allow inbound traffic from the load balancer.
Next, we created an ECS cluster, which acted as a logical grouping of container instances. This cluster provided a scalable and efficient environment for deploying and managing your containers.
Following that, we created a task definition for Nginx, specifying the Docker image, CPU and memory requirements, and setting the port to 80. This task definition served as a blueprint for running your Nginx containers.
Afterward, we created an ECS service for Nginx, selecting the load balancer security group and attaching the load balancer. This allowed the service to distribute incoming traffic across multiple Nginx instances and ensure high availability.
Additionally, we configured the load balancer, creating an Application Load Balancer (ALB) and setting it up for your Nginx service. The ALB helped evenly distribute the traffic to the Nginx containers and improved the availability and performance of your application.
Finally, we tested and verified the setup by accessing the Nginx application via the load balancer. we ensured that the load balancer was functioning correctly and troubleshooted any common issues that arose.
Through this practical project, you gained hands-on experience with ECS, Nginx, and load balancing, witnessing the benefits of scalable container orchestration, high-performance web serving, and improved application availability.
Thanks for reading the complete blog!!! See you soon at the next one 😊
Do check out my other blogs as well...👋👋